 MoviePro
Find the controls#
The Pro screen in landscape, ready to record. Each number marks a control. The Control key below says what each one does and where it is explained.
Control key#
Numbers match the figure above. Each entry links to the section that explains the control.
| Control | Use | |
|---|---|---|
| 1 | PRO badge | Switch scene: AUTO, PRO or DUAL. During a take the badge shows the active preset or the recording format instead. Recording key |
| 2 | Telemetry | ISO, S, ƒ (iPhone 18 Pro and 18 Pro Max only), WB and TINT. Tap a value to open its rail and adjust it; its color shows whether it is automatic or fixed. Use the telemetry controls |
| 3 | Camera / lens | Choose a camera: a physical lens such as 13 MM · 0.5X or 120 MM · 5X, or the 48 MM · 2X entry, a crop of the main camera's sensor rather than a separate lens. Choose a camera |
| 4 | More () | Torch, Stabilize, Grid, Reticle, Remote and Next Clip. The More menu |
| 5 | Zoom rail | Drag to zoom. The › at the top opens the rocker for smooth speed-controlled zoom, and A/B for repeatable zoom moves. Zoom and the rocker |
| 6 | Record / Stop | Start a take; stop and finish the file. Record, pause and stop |
| 7 | Settings | Every recording, audio, interface and storage setting, in one scrolling list. Find a setting |
| 8 | Library | Your recorded clips: play, inspect, mark and share them. Review and share recordings |
| 9 | Presets | Save the current setup or apply a saved one, in a panel over the live view. Save and apply a preset |
| 10 | Audio meters | Input level and source (INT, USB, BT or EXT). The icon turns red when the signal clips. Tap to open the audio controls. Microphone and monitoring |
| 11 | Scope tile | A live thumbnail of the selected scope: Luma, Parade, Wave or Vector. Tap it to open the full scopes panel. Scopes |
| 12 | Monitoring tools key | Opens and closes the scopes panel: the four scopes plus peaking, zebra, false color and clipping. Scopes |
| 13 | Focus key | Opens the Focus rail on the left edge: hold autofocus, focus manually, or run an A/B focus pull. Manual focus Focus pull (A/B) |
| 14 | Storage | Recording time left at the current format and destination, rounded down: 22H, 4:12H or 45M. Turns red below 10 minutes. Tap for Remaining, Free and Total. Check remaining storage |
| 15 | Battery | Charge level; the icon shows a bolt while charging. Tap for Charge and State (Charging, Full or On battery). |
The screen while recording#
When a take starts, the Pro screen shows the recording and moves controls that would interrupt it out of reach. Exposure, focus, zoom and the monitoring tools stay available throughout the take.
Recording key#
Numbers match the figure above. Each entry links to the section that explains it.
| Control | During a take | |
|---|---|---|
| 1 | Status badge | The PRO badge becomes a label showing the active preset, or the recording format such as 4K · 24. It cannot switch scene until the take ends. Record, pause and stop |
| 2 | Telemetry | Still adjustable, and a rail that is open stays open. Use the telemetry controls |
| 3 | More () | Still available; Stabilize and Remote are locked until the take ends. The lens chip beside it is hidden. The More menu |
| 4 | Zoom rail | Still available, including the rocker and A/B moves. Zoom and the rocker |
| 5 | Record / Stop | Tap it again to stop. MoviePro then saves the file and shows the result. Record, pause and stop Read the Take Receipt |
| 6 | Pause | Pauses the take and becomes Resume. Record, pause and stop |
| 7 | Timer | Takes the place of Settings, Library and Presets: a red dot and the take's duration in hours, minutes, seconds and frames. It shows PAUSED while paused and SAVING while the file is finalized. Record, pause and stop |
| 8 | Monitoring | Audio meters, scopes and the focus key stay available. Microphone and monitoring Scopes |
| 9 | Storage | Stays visible; the estimate counts down as the take records. Check remaining storage |
| 10 | Battery | Stays visible during the take. |
iPhone portrait#
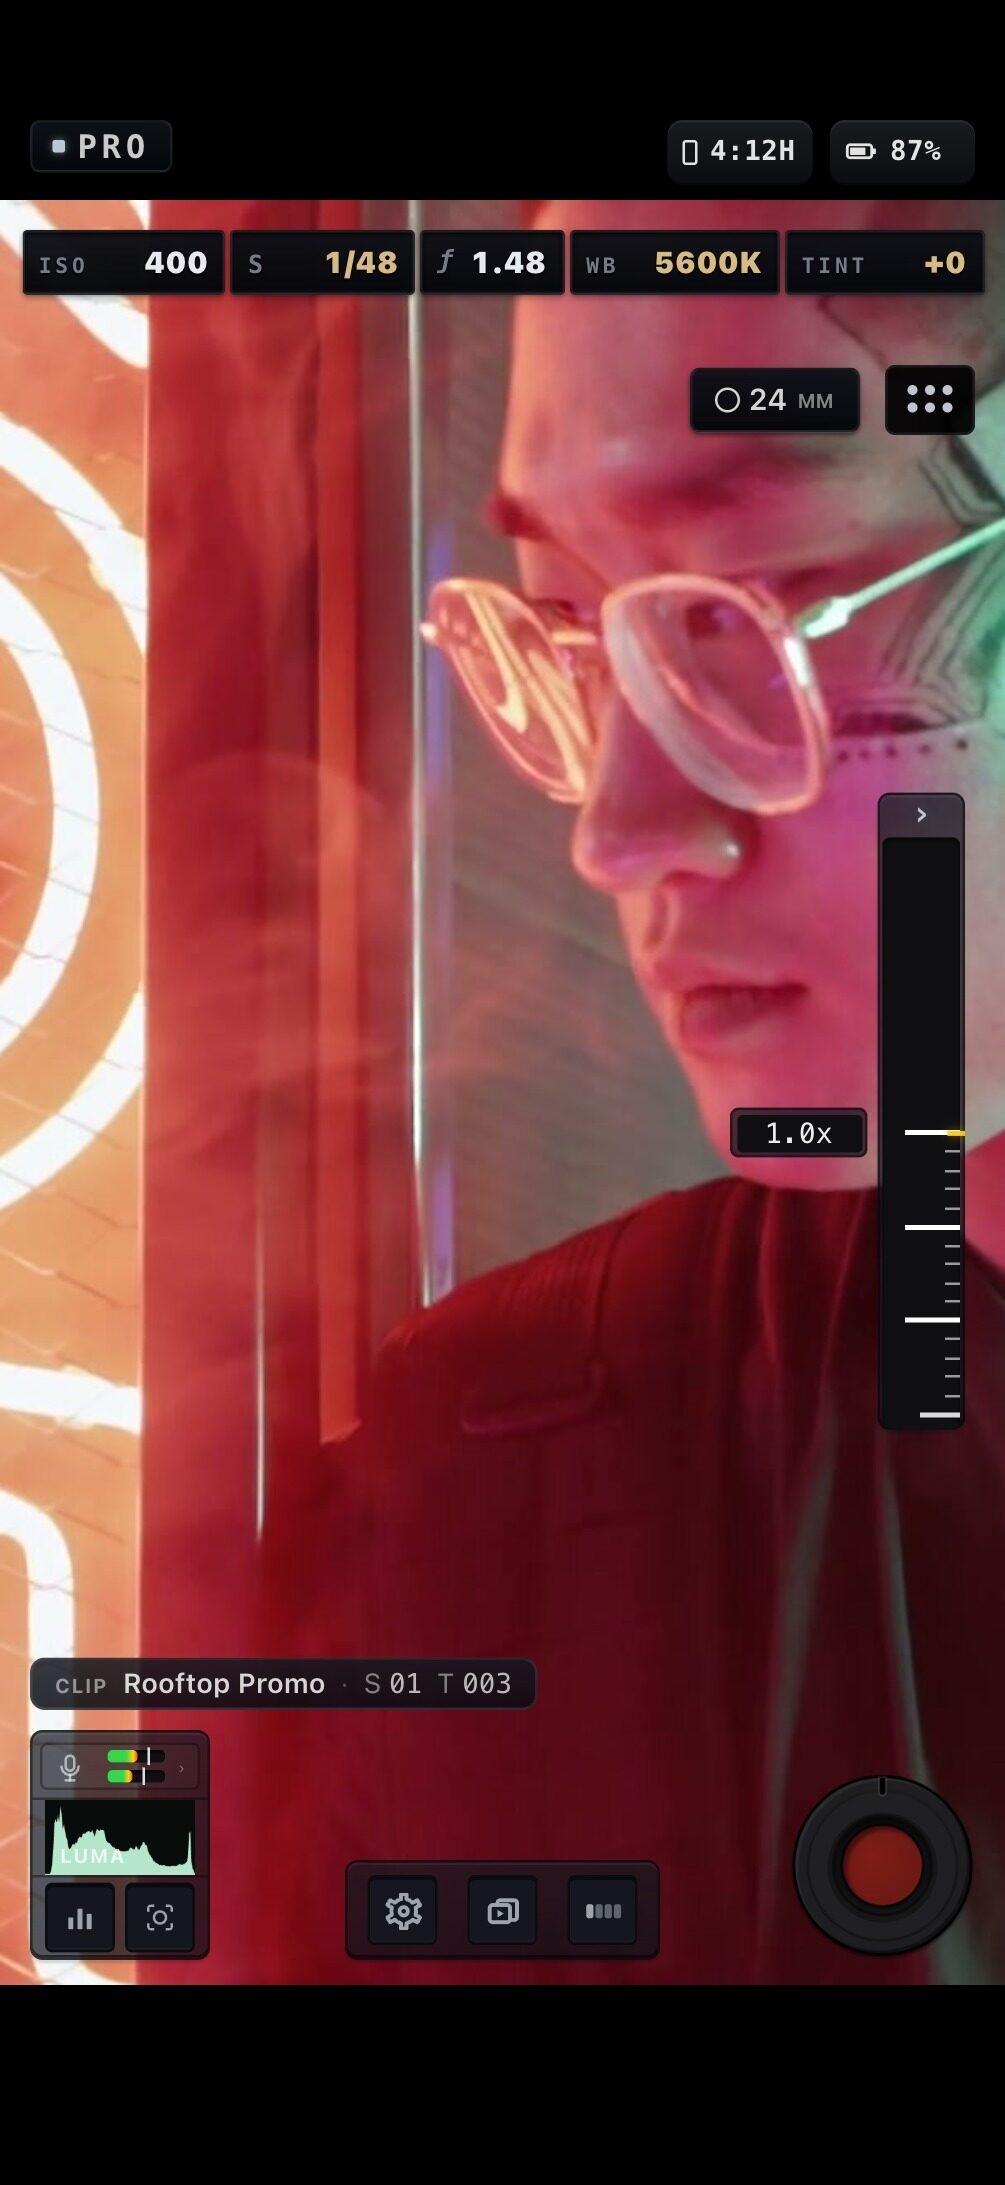
The controls work as in landscape; only their places change. The scene badge and the storage and battery indicators sit above the telemetry row. The lens selector and More () button stay at the top edge of the picture. Audio, scopes, the tray and Record sit below the picture.
When a procedure names a control, find it by name first; its position in portrait differs from the landscape figures in this manual.
Pro on iPad#
The same controls as on iPhone, arranged for the larger screen: the scene badge, mic meter and clip slate at top left, telemetry centered, status, lens and More () at top right, and the tray and Record below the picture. The iPad key below says what each one does.
iPad key#
Numbers match the figure above.
| Control | On iPad | |
|---|---|---|
| 1 | PRO badge | Switch scene, as on iPhone. |
| 2 | Mic meter | Input level; tap for audio controls. Microphone and monitoring |
| 3 | Clip slate | The next clip's project, scene and take, when set. Name clips with Next Clip |
| 4 | Telemetry | ISO, S, WB, TINT and FOCUS (AF or MF). Rails open on the right; a tap outside closes them. Use the telemetry controls |
| 5 | Storage | Recording time left. Check remaining storage |
| 6 | Battery | Charge level and state. |
| 7 | Lens | Choose a camera. Choose a camera |
| 8 | More () | Torch, Stabilize, Grid, Reticle, Remote, Next Clip. The More menu |
| 9 | Scope tile | Live scope; tap to expand. Scopes |
| 10 | Tray | Settings, Library, Presets. Find a setting |
| 11 | Record | Start and stop; Pause appears during a take. Record, pause and stop |